Fazendo simulações de DNA em solventes Mistos
27 May 2020 - Gustavo Café
Após não achar nenhuma documentação decente para este problema específico, resolvi procurar em diversas fontes e mergulhar de cabeça. O problema é tirado de um desafio no final do tutorial B02 do site oficial do AMBER MD (um software de dinâmica molecular). No final do tutorial o autor sugere “Feel free to use what you have learned to experiment with alternative starting geometries. Do they all change to B-DNA if run for long enough? What about in a mixture of 80% water, 20% ethanol?” porém não da dicas de como proceder, e também não encontrei ninguém que tivesse enfrentado o problema na internet (?talvez na Deep web???). Bom agora não precisa mais, porque a porca solução está aqui. Mais informações podem ser encontradas no meu Github, em uma pagina dedicada.
Disclaimer
I have not ommited any of the simulation flaws, but I commented on them. Mostly because I think they are relevant to the learning process, and this is, after all, a Tutorial. I have hinted better ways to solve these problems so you can take the better path.
Solving Tutorial B1 final challenge, A-DNA in 80%water 20%ethanol solvent
If you have been trough the Tutorial B1 from AMBER website, first of all, congratulations, secondly, you have probably seen that there is an extra “Feel free to use what you have learned to experiment with alternative starting geometries. Do they all change to B-DNA if run for long enough? What about in a mixture of 80% water, 20% ethanol?” at the end. So I went for it. But as I could not find any ethanol solvent, things got messy pretty quickly. This is my attempt to solve the challenge. Also, this may be used for future reference on solving this extra, since I could not find anything that could guide me all the way through, I had to figure it out by myself. Feel free to follow these steps, if you want to save some of your time.
Or, if you want to be brave, here are the links I found most usefull:
- Packmol, a very usefull tool for building solvents
- AMBER Tutorial 15, for building molecules from zero
- A guide to understan PDB data
- This dudes own wiki
If you found a better way to solve any of the steps below (for example, building the solvent first, then putting the DNA in, which is a more secure way of simulating) please contact me. I would be more than glad to add it to the repository. Now let’s get started
STEP BY STEP
First and Foremost: Building your molecules
For the water molecules, there is a good enough .pdb file already, no need to make them. Also, Leap interprets them quite easily. The problem are the ethanols…
I could not find any descent pdb file for ethanol. So I made my own! This is quite easy. First you need to enter Xleap, create a molecule and edit it. So, first enter the command edit ETH, then you will draw your atoms and bonds: two C and one O with single bonds. Don’t draw the H. Now click Add H & Build, next select your whole molecule with clicking and holding the left mouse button. Then select Relax Selection on the top menu. You will notice that Leap added the natural geometry for the ethanol.
Ok, now save it with
savepdb ETH ETH.pdb
Now Let’s use Antechamber to create a file that carries all the charge information we want (i.e. coulombic information). On your terminal use the following command (you can type “-help” for more info)
antechamber -i ETH.pdb -fi pdb -o ETH.mol2 -fo mol2 -dr no -c bcc -nc 0
-i is for input, -fi is for input filetype, -o output, -fo output filtype, -dr acdoctor mode (AMBER manual for more info), -c charge method, -nc net charge (molecular).
Ok, now we want to create files that that fill missing parameters, if necessary. By now you probably realized how Leap overinterprets every single command. For that we’ll use Parmchk, to create the frcmod files we want.
parmchk -i ETH.mol2 -f mol2 -o frcmod.eth
- Note: Leaps GAFF, and gaff.dat parameters, is probably enough (I haven’t tested these, without using parmchk, but you’re more than welcome to).
Packmol
Ok, time to build our system (You probably noticed that, when your solvate is not only water and ions, Leaps is a bit of a headache). You’ll have to build it out of Leap too.
- Note: The smart thing to do here (which I didn’t do). Is to first build the solvate (eth + wat), relax it with some minimization (with sander), and then just add it to Leap’s library. Because in this way you will have it whenever you want. So you could just run some “solvate box yada yada yada” to get things going. But because I started the wrong way, I finished it with the same stuborn mindset. So here is what I did: Built it all together (solvate + DNA) then relaxed solvate with DNA fixed in place, then ran MD. Both breed the same result, for this very specific context. If you want to pursue the first one, check the last link in “usefull links” tab.
Packmol only takes .inp files as input, in this fashion
packmol < mixture.inp
I have commmented the mixture.inp file, if you want to know what each step does.
The output should be a a-dna_eth_water_solvate.pdb file.
Important: Put TER between resid 10 and 11 at the output file. (don’t know why this happens, but you can’t generate the topology files if there are atoms that Leap can’t understand, and leaving them wihtou TER, causes Leap to think they have the same name). For some reason packmol erases a ‘TER’ line between residues 10 and 11… can’t figure out why.
If you have any further doubts you should check the link at the top to Packmol’s user guide.
Now we are finally ready to load our files to XLeap!!
Building Topology files
XLeap
For building our topology and coordinates files just run the following commmands:
loadamberparams gaff.dat
source leaprc.water.tip3p
loadAmberParams frcmod.tip3p
loadAmberParams frcmod.ionsjc_tip3p
loadamberparams frcmod.eth
ETH = loadmol2 ETH.mol2
DNA =  loadpdb a-dna_eth_water_solvate.pdb
addions DNA Na+ 0
set box DNA 80.0
saveAmberparm DNA DNA.prmtop DNA.inpcrd
quit
So actually we did not use TIP3P water, we used our own water.pdb. But we are using the frcmod.tip3p to interpret our water as TIP3P, neat eh?
You can edit ETH and DNA to see if everything is ok. Also, If you went through Tutorial B1, all of these commands should make sense, except the “frcmod.eth” which we explained above, and the “set box DNA 80.0”. The last one is because, when running Sander, you have to specify the limits of your system, in this case we did it with Leap. I don’t quite understand why this isn’t a feature in packmol.
Minimization & MD
There’s no much secret here. Just remember that the Tutorial is not up to date, and that you should write ntx = 5 (not 7) on your .in file, if you want it to pick up from the previous one. Also, the following commands are for the directories in this repository as they are presented. One more thing, you should customize the MPI options to whatever suits best your installation and requirements.
Minimization (not holding DNA fixed, its a dangerous idea!)
This should run at the Main directory.
mpirun -np 4 $AMBERHOME/bin/sander.MPI -O -i DNAmin.in -o DNAmin.out -p dna.prmtop -c dna.inpcrd -x DNAmin.nc -r DNAmin1.ncrst -ref dna.inpcrd
This takes approx 11min.
First MD: (DNA weakly fixed)
This should run at the MD1 directory.
mpirun -np 4 $AMBERHOME/bin/sander.MPI -O -i DNA_md1.in -o ../MD2/Output/DNA_md1.out -p ../dna.prmtop -c ../DNAmin1.ncrst -x ../MD2/Output/DNA_md1.nc -r ../MD2/Output/DNA_md1.ncrst -ref ../DNAmin1.ncrst
This takes approx 8 to 9min.
Second MD:
this should run at the MD2 directory.
There’s a Run_10steps.x script for continuous running (in 200ps chunks), dont forget to add the ‘chmod’ for access. Also, customize the Run_10steps.x file to suit your amber installation (with more or less CPU units, and directories).
chmod +x Run_10steps.x
nohup ./Run_10steps.x >& run.log &
Ok! Now after a long night (maybe 2?) of sleep you should be good to go! Since this takes around 20hs to finish.
Conclusion
First, let’s take a look at our RMS fit plot !
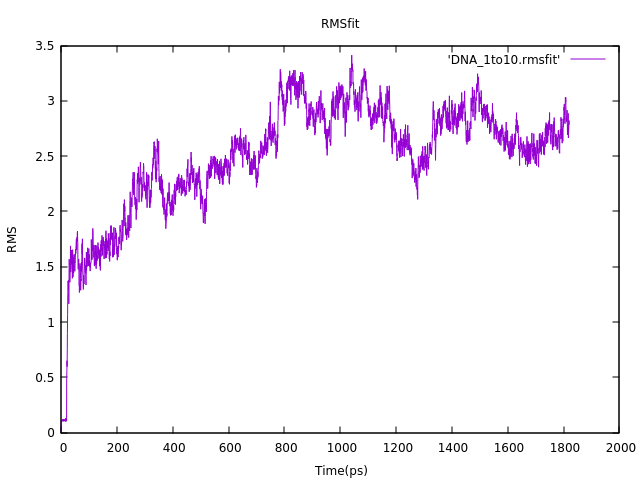
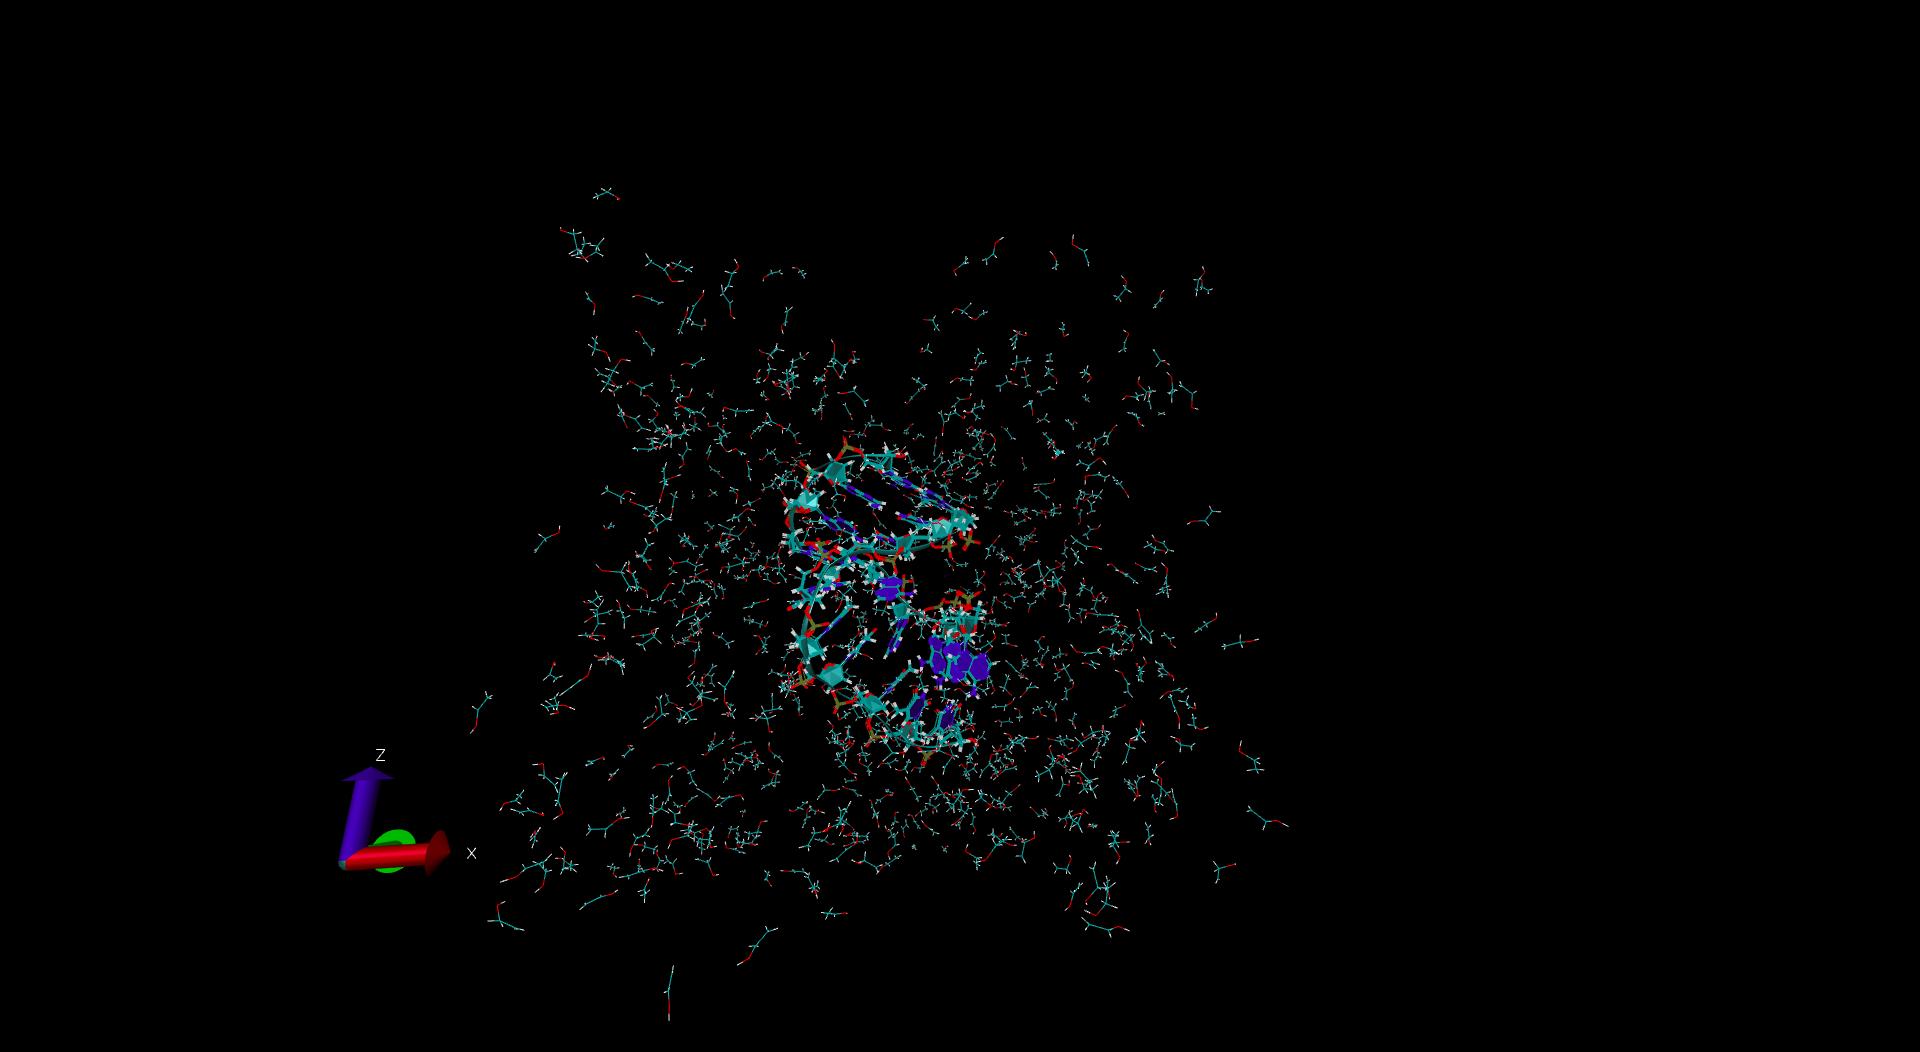
It should be evident that our molecule is going through some transformation for the first 800ps. But it is not. Actually, if you run it on VMD, you will realize that it is actually doing a translational motion. You may be wondering why. If you check the minimization .nc file, you will see that, as soon as the simulation started, the ethanols just grabbed any other molecule that was around them, forming vacuum pouches. If we ran the minimization longer, these vacuum would probably be filled up, since the system tends to a more compact format. Since we did not run it as long as we should, the filling motion pushed the whole system a bit in a certain direction. If you check the RMS plot, you will notice that afterwards the DNA is stable, even thoug far from its initial position. This issue could be avoided if we actually ran the solvate separately, minimized it (long enough) and then solvated the DNA. This would be the right approach.
We can see that our DNA did not change its basic form. It mantained its initial form. It is probable that the ethanol created some higher energy restraint, so that the temperature was not high enough for the molecule to overcome the new potential and slide to a global minimum. In a more uncientific way to put it: the ethanol “grabbed” the DNA molecule and created a bit of a tougher ribbon (a sort of cage), restraining its movement. .
You can check the PlotsEPics directory for some images.
Hope this gave you some intuition on how to proceed with more complex solvates. Let me know if you had any doubts or any contributions.
Good Luck! :D